
A Salesforce Domain is required to enable secure public access to your app’s features, such as signing pages or external integrations.
Creating a domain allows you to host your public site under a trusted Salesforce URL (e.g.,https://yourdomain.my.salesforce-sites.com).
For Production
Use this domain for your live environment, where real integrations and external app connections will occur.
1. Open Setup
Click the ⚙️ Gear icon → Setup.
2. Go to Domains
In the Quick Find box, type Domains and click Sites and Domains → Domains.
3. Register Your Production Domain
Click Add a Domain.
Enter a name that was added in the sign2.me settings.
For example:
yourcompany → generates:

4. Verify Availability
Salesforce will check if the domain name is available.
Click Register Domain to confirm.
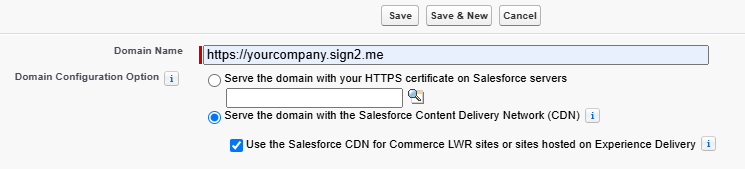
5. Serve the Domain Using Salesforce CDN
Before activating your domain, enable Salesforce Content Delivery Network (CDN) to optimize performance and security.
- On the Domain registration page, select:
Serve the domain with the Salesforce Content Delivery Network (CDN)
Use the Salesforce CDN for Commerce LWR sites or sites hosted on Experience Delivery - This option uses Salesforce’s CDN partner (Cloudflare or Akamai) to:
- Improve content delivery performance.
- Enhance site availability and caching.
- Securely handle SSL certificates and public traffic.
- Improve content delivery performance.
6. Wait for Provisioning
Once submitted, Salesforce will process your request.
When completed, the domain status changes to Completed or Ready for Use.
7. Activate the Domain
Click Activate to enable your new domain.
After activation, it becomes publicly available for use on sign2.me.
8. Link a Site to the Domain
To expose a public endpoint or app page:
- Go to Setup → Sites.
- Click on edit the site from the previous sign2.me settings.
- Choose your newly created domain.
- Save and activate the site.
Your production domain is now ready for use with integrations and public access.
For Sandbox
Domain creation must be performed in a production organization.
1. Open Setup
Click the ⚙️ Gear icon → Setup.
2. Go to Domains
In the Quick Find box, type Domains and click Sites and Domains → Domains.
3. Register Your Sandbox Domain
Click Add a Domain.
Enter a name that identifies your sandbox or testing environment.
For example:
yourcompany-dev → generates:
https://yourcompany-dev.sandbox.my.salesforce-sites.com
🛈 Tip: Include a suffix like -dev, -test, or -uat to clearly separate environments.
4. Verify Availability
Salesforce will confirm if the domain name is available.
Click Register Domain to proceed.
5. Serve the Domain Using Salesforce CDN
Before activating your domain, enable Salesforce Content Delivery Network (CDN) to optimize performance and security.
- On the Domain registration page, select:
Serve the domain with the Salesforce Content Delivery Network (CDN)
Use the Salesforce CDN for Commerce LWR sites or sites hosted on Experience Delivery - This option uses Salesforce’s CDN partner (Cloudflare or Akamai) to:
- Improve content delivery performance.
- Enhance site availability and caching.
- Securely handle SSL certificates and public traffic.
- Improve content delivery performance.
6. Wait for Provisioning
After a few minutes, Salesforce will mark the domain as Ready for Use.
7. Activate the Domain
Click Activate to make your sandbox domain accessible.
This domain is ideal for:
- Testing app integrations (like sign2.me)
- Validating public endpoints
- QA and UAT testing before production rollout
8. Link a Site to the Domain
- Go to Setup → Sites.
- Create or edit a site.
- Select your newly registered sandbox domain.
- Save and activate.
Your Sandbox domain is now ready for testing integrations and public endpoints safely.